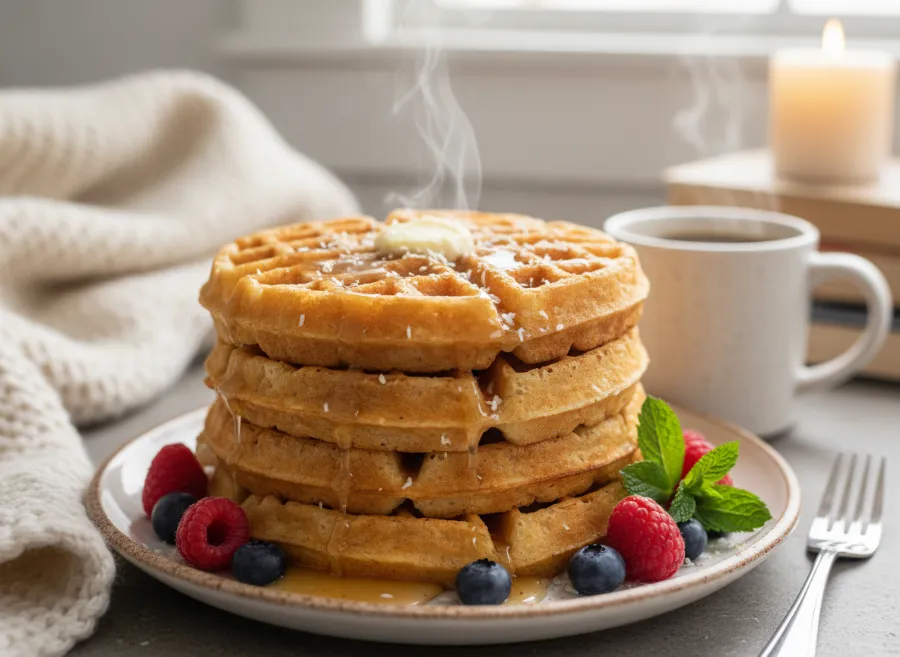
Waffles occupy a very specific place in the breakfast imagination — that golden, crispy exterior giving way to a fluffy, tender interior, with those perfectly formed deep pockets designed by nature to hold pools of butter and syrup. They are the breakfast that makes ordinary weekday mornings feel special, and giving them up when transitioning to keto feels like surrendering one of life’s small but genuine pleasures. Keto Coconut Flour Waffles restore that pleasure completely. Made with coconut flour rather than wheat flour, enriched with cream cheese and eggs for structure and richness, and cooked in a hot waffle iron until genuinely crispy on the outside and fluffy within, these waffles achieve the authentic waffle experience — the crunch, the pocket structure, the tender interior, the satisfying heft — with under 4 net carbs per waffle and a preparation time of just 20 minutes. Topped with a drizzle of sugar-free maple syrup, a pat of melting butter, and fresh berries, they are genuinely indistinguishable from a great traditional waffle to anyone who has not been told otherwise.
Coconut flour behaves very differently from almond flour in keto baking — it absorbs far more liquid, requires more eggs for structure, and produces a slightly different texture that can be genuinely excellent when the ratios are properly calibrated. The key advantage of coconut flour for waffles specifically is that it produces a crispier exterior than almond flour because of its lower fat content and different starch structure — the waffle iron’s heat dries the coconut flour surface more completely, creating a more authentic crispy shell. The cream cheese in this recipe adds the richness and slight tang that butter alone cannot provide, and the combination of baking powder and beaten eggs creates enough lift to produce waffles that are genuinely fluffy rather than dense and flat.
The deep pockets of a properly made coconut flour waffle are also particularly effective at holding sugar-free maple syrup — each pocket becomes a tiny reservoir that ensures every bite has perfect syrup distribution rather than the pooling and running that affects flatter, less structured waffles.
Why You Will Love Keto Coconut Flour Waffles
Genuinely crispy exterior, fluffy interior — Coconut flour’s unique properties in a hot waffle iron create authentic waffle texture — crispy golden shell and tender, fluffy interior — that rivals any traditional waffle.
Under 4 net carbs per waffle — Each waffle delivers complete breakfast satisfaction with minimal carb impact, making these suitable for daily keto breakfast rotation.
Ready in 20 minutes — Mix the batter, preheat the waffle iron, cook. From cold ingredients to plated, topped waffles takes just 20 minutes — practical for weekday mornings and leisurely enough for weekend brunch.
Deep pockets for toppings — The structured pocket pattern holds sugar-free maple syrup, fresh berries, and whipped cream beautifully, ensuring perfect topping distribution in every bite.
Naturally grain-free and gluten-free — With coconut flour replacing wheat flour entirely, these waffles are suitable for grain-free, gluten-intolerant, and celiac dietary requirements alongside keto.
Ingredients You Will Need
This recipe makes 4 standard waffles.
For the waffle batter
- Quarter cup coconut flour — sifted to remove any lumps
- 3 ounces cream cheese, fully softened to room temperature
- 4 large eggs, room temperature
- 2 tablespoons unsalted butter, melted and slightly cooled
- 2 tablespoons powdered keto sweetener — allulose or monk fruit
- 2 tablespoons unsweetened almond milk
- 1 teaspoon vanilla extract
- 1 teaspoon baking powder
- Pinch of salt
- Coconut oil spray or butter for greasing the waffle iron
For serving
- Sugar-free maple syrup
- Unsalted butter, sliced
- Fresh berries — blueberries, raspberries, or sliced strawberries
- Sweetened whipped cream
- Optional toasted coconut flakes for garnish
- Optional dusting of powdered sweetener
Step-by-Step Instructions
1. Preheat the waffle iron
Preheat your waffle iron on medium-high heat. A properly preheated waffle iron is essential for crispy waffles — adding batter to an insufficiently hot iron produces pale, soft waffles that stick rather than releasing cleanly with a golden crust. Allow at least 5 minutes of preheating time.
2. Beat the cream cheese and eggs
In a large mixing bowl, beat the fully softened cream cheese with an electric hand mixer on medium speed for 90 seconds until completely smooth with zero lumps. Add the eggs one at a time, beating briefly after each until fully incorporated. The mixture should be smooth, pale, and slightly airy after the eggs are added. Cold cream cheese will not beat smoothly — it must be genuinely room temperature.
3. Add wet ingredients
Add the melted butter, almond milk, vanilla extract, and powdered sweetener to the cream cheese egg mixture. Beat on low speed until fully combined and uniform.
4. Add dry ingredients
Sift the coconut flour, baking powder, and salt together. Add to the wet mixture and fold gently with a spatula until just combined. Do not overmix — fold until no dry coconut flour pockets remain and the batter is smooth. Let the batter rest for 3 to 4 minutes — coconut flour absorbs liquid slowly and the batter will thicken considerably during this resting period. After resting, the batter should be thick and scoopable rather than pourable. If it seems too thick to spread in the waffle iron, add one tablespoon of almond milk and stir gently.
5. Grease and fill the waffle iron
Open the preheated waffle iron and spray generously with coconut oil spray or brush with melted butter. Scoop approximately a quarter of the batter onto the center of the lower waffle iron plate. Close the iron gently — the batter will spread to fill the pattern as the iron closes and the batter softens from the heat. Do not press down hard on the iron as this compresses the waffles and eliminates the fluffy interior.
6. Cook until golden and crispy
Cook for 3 to 5 minutes until the waffle iron’s steam indicator shows minimal steam release — the reduction in steam indicates the waffle is drying out on the surface and approaching crispy. Open the iron carefully. The waffle should be deep golden brown with a visible crispy crust on all surfaces and should release cleanly from both plates without tearing. If it sticks, close the iron and cook for another 60 seconds. Transfer to a wire rack rather than a plate — placing hot waffles on a plate traps steam beneath and makes the bottom soggy. Repeat with remaining batter.
7. Serve immediately or keep warm
Serve immediately for maximum crispiness. To keep waffles warm and crispy while cooking subsequent batches, place on a wire rack in an oven set to 200 degrees Fahrenheit — this keeps them warm without trapping steam and softening the exterior.
8. Top and serve
Place one or two waffles on each plate. Add a generous pat of sliced butter over the top, drizzle sugar-free maple syrup over and into the deep pockets, arrange fresh berries alongside, and add a dollop of sweetened whipped cream. Optional toasted coconut flakes and a light dusting of powdered sweetener complete the presentation.
Flavor Variations
Blueberry coconut flour waffles — Fold a quarter cup of fresh blueberries into the batter just before cooking for a blueberry waffle version with pockets of fresh berry flavor throughout.
Chocolate chip coconut flour waffles — Fold two tablespoons of sugar-free mini chocolate chips into the batter for a dessert-style waffle variation that is particularly popular with children.
Lemon ricotta waffles — Replace cream cheese with whole milk ricotta and add the zest of one lemon for a lighter, Italian-inspired waffle with a delicate citrus note.
Cinnamon roll waffles — Add half teaspoon of cinnamon to the batter and serve with a cream cheese glaze made from softened cream cheese, powdered sweetener, vanilla, and almond milk for a cinnamon roll inspired breakfast.
How to Fit This Into a Keto Plan
- Net carbs: About 3 to 4 grams per waffle, primarily from coconut flour
- Protein: Around 7 to 8 grams per waffle from eggs and cream cheese
- Fat: High from cream cheese, butter, and eggs — supports morning ketosis and sustained energy
Two waffles with toppings make a complete, satisfying keto breakfast with approximately 6 to 8 net carbs total — comfortably within most daily keto targets.
Meal Prep and Storage
Fridge: Store cooked waffles in an airtight container for up to 4 days. Reheat in a toaster or toaster oven for best crispiness restoration — never microwave as it makes waffles soft and chewy.
Freezer: Freeze waffles in a single layer on a baking sheet then transfer to a freezer bag for up to 2 months. Toast directly from frozen in a toaster or toaster oven for an instant crispy keto breakfast.
Meal prep tip: Make a double batch on Sunday and freeze — you have crispy keto waffles available every morning of the week with zero preparation, simply toasting from frozen.
Tips for Perfect Keto Coconut Flour Waffles Every Time
- Fully soften cream cheese — cold cream cheese creates lumps that affect both texture and appearance.
- Let batter rest 3 to 4 minutes — coconut flour needs time to absorb liquid and the batter thickens significantly during resting.
- Preheat waffle iron fully — insufficient heat produces pale, soft waffles that stick.
- Use a wire rack not a plate — keeping waffles on a wire rack prevents the bottom from steaming soft.
- Cook until steam reduces — the steam indicator is the most reliable guide to doneness.